AudioProcessing.Compute.VirtualMidiDevice.StepSequencer
This node creates an instance of a step sequencer as a virtual MIDI device within the GSN Composer. It allows playing, editing, and recording of MIDI messages for the triggering of instruments. It can be used for many tasks, starting from creating simple drum machine beats up to composing complete songs with multiple instruments.
In the image below, the user interface of the step sequencer node is shown:

Dependent on the current task, the step sequencer has three main views: Pattern, Track, and Song. Additionally, the track view has four sub-views: Inspect, Record, Edit, and Quantize. The different views are accessible via the buttons in the upper left corner of the interface. In the following, the functionality of each view is described.
Views
Pattern View
The term pattern is very commonly used in the context of step sequencers and drum machines. A pattern is a building block of a song and consists of rows that contain the rhythmic information for the Note On and Note Off messages of the musical notes. For MIDI, musical notes can be emitted in the range from 0 to 127, where 0 corresponds to the MIDI note C-2 and 127 to the note G8. You can scroll through the 128 different rows for the available MIDI notes of a pattern by using the slider and arrows on the far left of the interface.
If you scroll higher than note G8, you notices that the rows above G8 are used for MIDI control change (CC) messages as well as for the MIDI pitch change message.
When the pattern view is active, the selected pattern is played in a loop. The two moving vertical lines indicate the section of the pattern for which MIDI messages are emitted in the current processing step. The green line indicates the start of the processed section, and the red line the end.
The purple rounded markers indicate the individual notes and their length. At the start of the marker a Note On message is emitted and at the end a Note Off message. Control Change and Pitch Change messages are only emitted at the start of the marker (consequently, the length of the marker is irrelevant for those messages). Musical notes, which are too short to be displayed as rounded markers, are indicated by purple triangles, as shown in the example below.
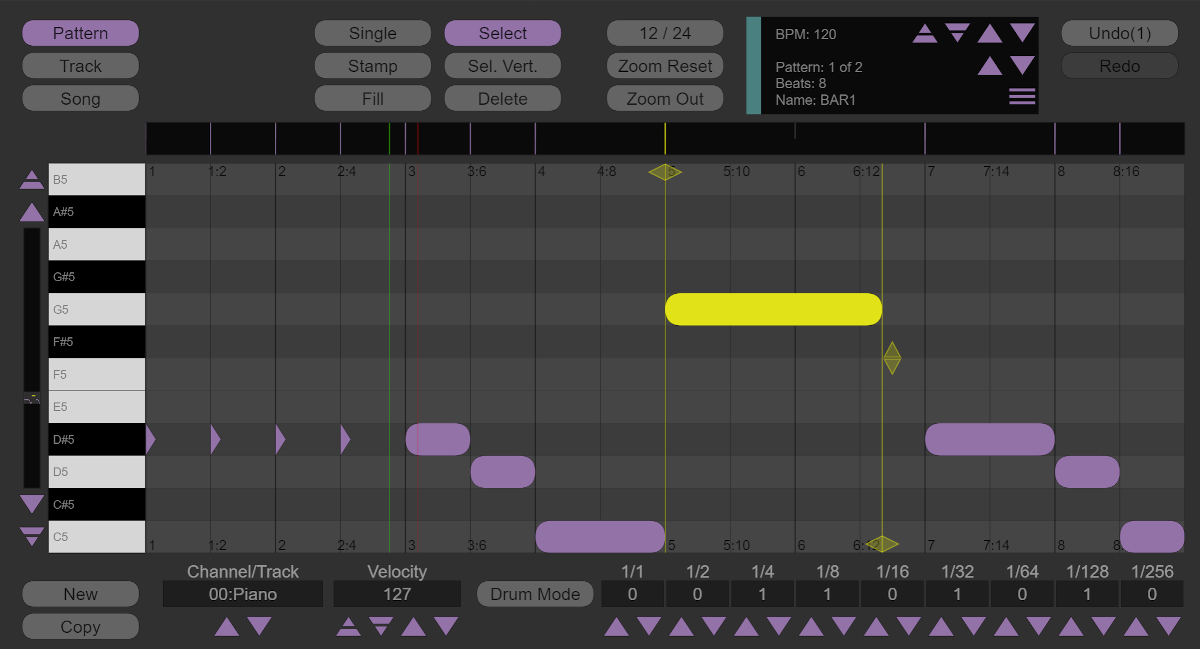
For the creation and editing of musical notes different tools can be selected via the buttons at the top of the interface:
| Single | Create a single note. |
| Stamp | Create multiple notes by stamping a note pattern. To create a new stamp pattern, select multiple notes with the select tool and switch to the stamp tool. |
| Fill | Fill the selected row with notes of the currently active note length. |
| Select | Select and edit one or multiple notes. Selected notes can be moved by using the yellow handles (shown in the figure above). While moving, hold down the shift key to snap to the grid. |
| Sel. Vert. | Select all notes within an area that is vertically infinite (select the same time range in all rows). |
| Delete | Delete the selected notes |
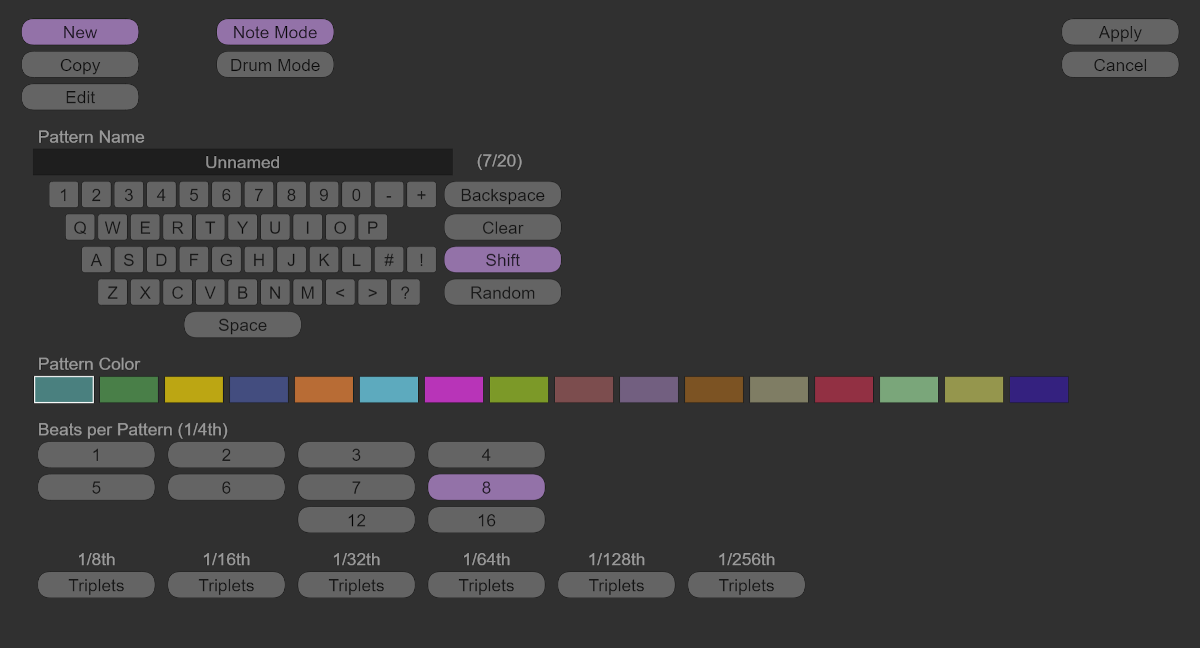
New patterns can be created via the new button. A dialog (shown below) appears for selecting the options for the new pattern. The same dialog is shown when the copy button in the pattern view is pressed. However, instead of the option new, the option copy is pre-selected, which creates a new pattern and copies the notes of the currently selected pattern into the new pattern. If you click on the information box (black background, top right in the pattern view), the option edit is pre-selected, which changes the settings for the currently selected pattern without creating a new pattern.
The note mode is the default mode for creating musical notes. In this mode, the length of a note is relevant and its true value is displayed by the purple note markers. For some instruments, such as drums, the Note Off message is typically ignored. In these cases, the drum mode provides a more convenient way to enter notes because the length of a created note is automatically determined by the size of a grid cell. Even if a note is longer than a grid cell, the shown note markers are never longer than one grid cell because their length does not matter anyway.
The size of a grid cell depends on the current zoom level. You can zoom in the pattern by clicking onto the horizonal black bar directly above the note grid. To zoom out, hold down the shift key while clicking on the black bar or use the provided zoom out button.
Track: Inspect View
A track consists of multiple patterns that are played in a consecutive order. However, it is often the case that the same pattern should be played multiple times in the same track. Therefore, a track is defined by a list of pattern indices, e.g., the track "1 2 1 3" first plays the pattern with index 1, then pattern 2, then again pattern 1, and finally the pattern with index 3.
A song can consist of 12 different tracks. All MIDI messages of a track are send via the corresponding MIDI channel (where the GSN Composer starts counting MIDI channels with index 0). Thus, if you want to use multiple instruments, you must configure them to listen to a particular MIDI channel. As the number of tracks is limited to 12, it is possible to simultaneously trigger a maximum of 12 different instruments.
In the example provided below, only a single instrument, a piano, is available that is listening to MIDI channel 0. The piano plays the beginning of Beethoven's "Für Elise". The inspect view is not intended for editing but rather for reviewing the structure of a track. In the example below, it can be observed that the green pattern (named "Bar2") and the yellow pattern (named "Bar3") are both used twice in this track.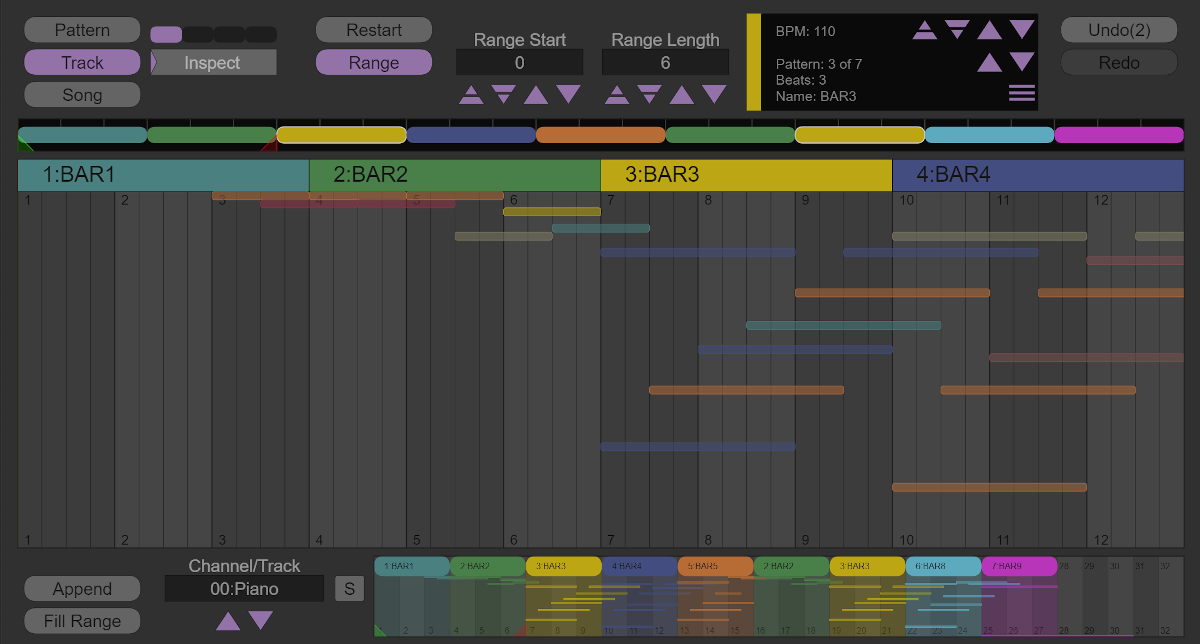
When the track view is active, the complete song is played in a loop. The restart button restarts the playback. It is also possible to limit the playback to a certain range of the track. To this end, the range button must be activated (as shown in the figure above). The start and end of the range are indicated by the small red and green triangles in the horizontal bar above the note grid. You can change the start and length of the range by dragging the triangles to a desired position or by changing the values via the button interface.
The inspect view can also be used to select a pattern (e.g., with the intention to edit it in the pattern view). To select a pattern, click on the corresponding colored pattern marker in the horizontal bar above the note grid. A selected pattern is indicated by a white border (in the example above, the yellow pattern "Bar3" is selected).
As the inspect view summerizes and visualizes the notes that are played by an instrument (and their timings), it can also be applied as a virtual replacement for sheet music while practicing with a real instrument. To support this usage, each semitone of an octave is displayed in a different color.

Track: Record View
The record view provides the possibility to record the MIDI input of another MIDI device, e.g., from a real MIDI keyboard controller. Connection of real MIDI hardware via the Web MIDI API is currently only usable in Google Chrome and Microsoft Edge (Chromium version). You can select the input device via the input MIDI device list. If your MIDI hardware is not listed, you might need to restart you browser. Please note, that only one application/browser can access the MIDI device at the same time. Consequently, if you have problems, you should try closing other applications that might interfere.
For recording, switch the channel/track of the track view to the desired instrument that should be recorded. The channel of the input MIDI controller must be set to the same channel. If the step sequencer receives MIDI notes from the selected input device on a wrong channel, a warning message is displayed. Please note, that all nodes in the GSN Composer starts counting MIDI channels with index 0. Your hardware MIDI controller might start with index 1. If you do not know how to switch channels on your MIDI hardware, consult its documentation. If you are sending signals on the correct channel, colored lines should appear in the black box next to the record button.
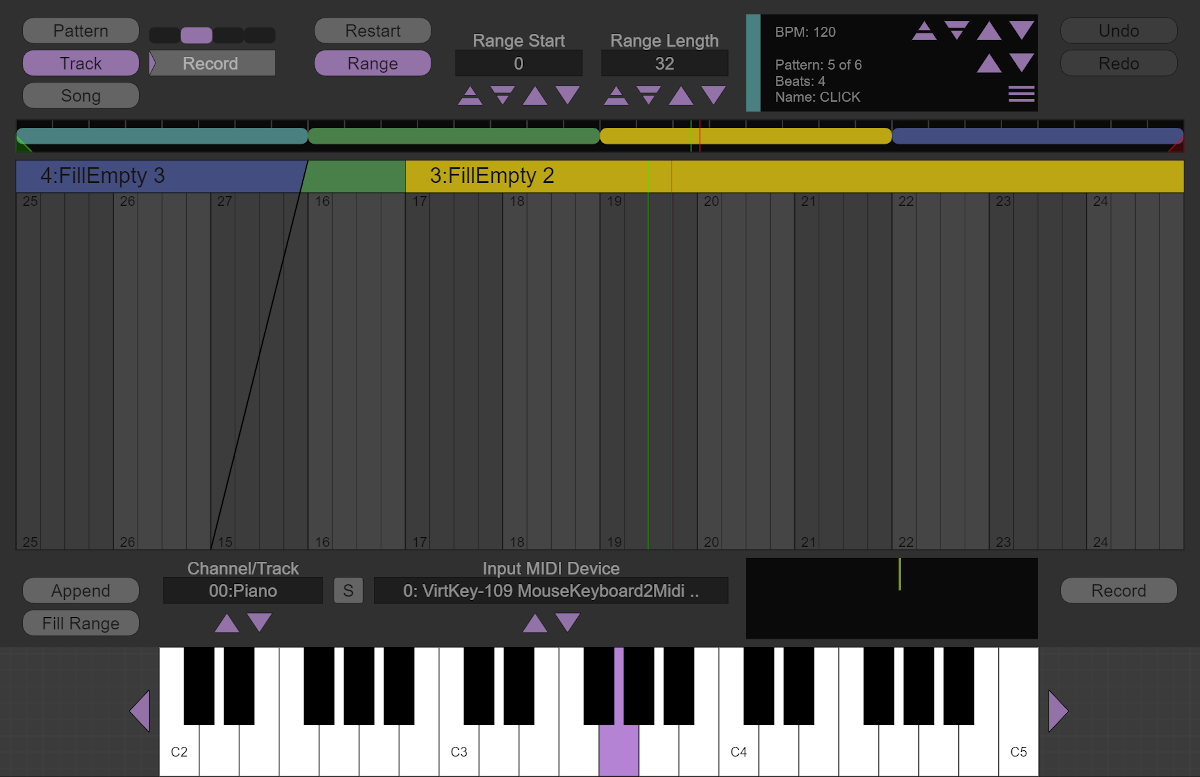
When you record MIDI messages, the inputs are stored into the pattern that is located at the currently played position of the selected track. If this pattern is used somewhere else within the track (or song), this part is also modified. If there is no pattern at the currently played position the input is lost. Consequently, if you want to make sure that there is no loss or side effect in other parts of the song, you should fill the range, which you are planing to record, with new patterns. To this end, you can press the fill range button, which will generate new patterns within the selected range (more options are available in the song view). The append pattern button appends the currently selected pattern at the end of the track. If you open the example above, everything is already prepared to record 4 bars with 8 beats each.
Once you have prepared your recording range, you can press the record button to start recording. Press the button again to stop recording.
Track: Edit View
The track edit view provides the same tools as the pattern view and is intended to edit the notes of the currently selected pattern. In the pattern view the pattern is played in a loop. In contrast, in the track edit view the complete track is played (or the selected range of the track). This way, patterns can be reviewed and changed within their context.
Track: Quantize View
The quantize view is an interface to automatically quantize notes. This is a task that is often required when notes are not manually enter but recorded from a hardware MIDI controller. There are three options:
| Pattern | Quantize all notes of the currently selected pattern. |
| Track | Quantize all notes of the current track. |
| Selection | Quantize the notes that are selected in the current pattern. |
Song View
A song can consist of 12 different tracks. In the song view the pattern arrangement for each track can be edited. In the example below, a simple music loop with a length of 8 beats is created from 4 tracks and their corresponding instruments.
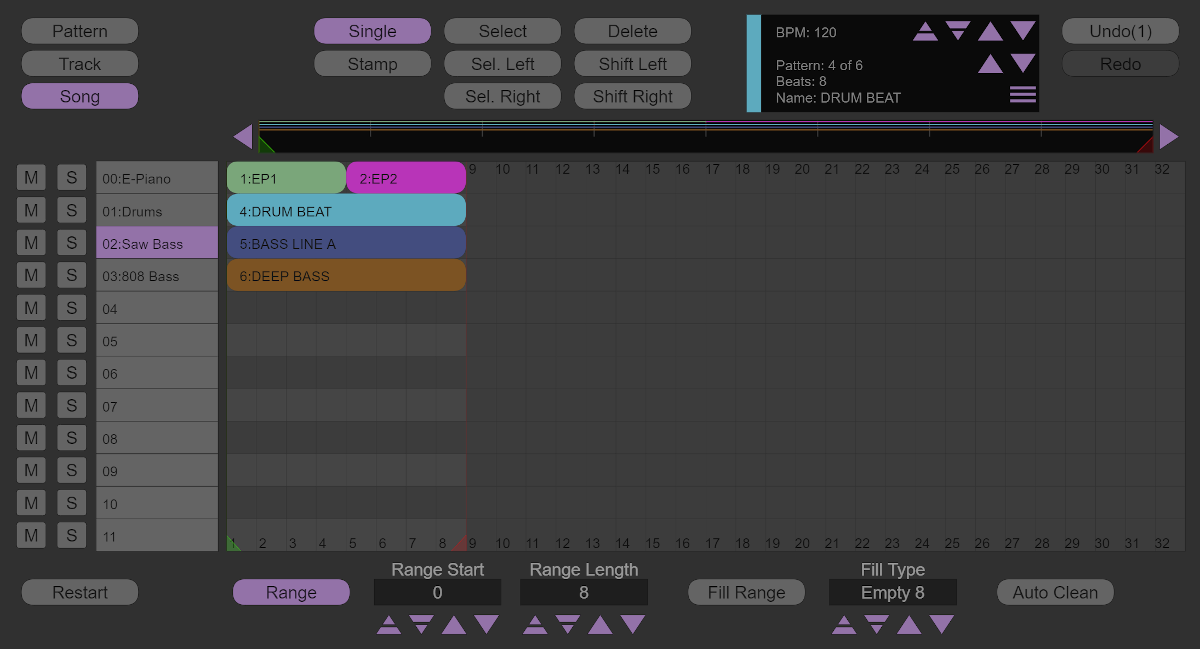
To edit the patterns within the song view, different tools can be selected via the buttons at the top of the interface:
| Single | Create a single pattern. |
| Stamp | Create multiple patterns by stamping a pattern collection. To create a new stamp, select multiple patterns with the select tool and switch to the stamp tool. |
| Select | Select one or multiple patterns. |
| Sel. Left | Select all patterns to the left. |
| Sel. Right | Select all patterns to the right. |
| Delete | Delete selected pattern(s) |
| Shift Left | Shift selected pattern(s) to the left |
| Shift Right | Shift selected pattern(s) to the right |
The buttons labeled M mute the corresponding track. If you press a solo button labeled S, the corresponding track is the only track that is not muted.
When the song view is active, the complete song is played in a loop. The restart button restarts the playback. It is also possible to limit the playback to a certain range of the track. To this end, the range button must be activated (as shown in the figure above). The start and end of the range are indicated by the small red and green triangles in the horizontal bar above the pattern grid. You can change the start and length of the range by dragging the triangles to a desired position or by changing the values via the button interface.
The Fill Range button fills the selected range with new patterns of selectable type. This is useful to prepare a track for recording.
Finally, the Auto Clean button deletes all patterns that are not used somewhere within the song.
Further Topics and Feedback
If you want to learn more about how to build your own modular instruments, you can follow this tutorial:
Using the GSN Composer as a Web-based Modular Synthesizer
The GSN Composer is constantly evolving and user feedback is very welcome. Please use the contact form or visit the forum on Reddit if you have questions or suggestions for improvement.